Prototyping with Expression Blend 3 + SketchFlow

Introduction
Software is getting even more complex, interactive and dynamic. It's nearly impossible, for a developer to find the best solution at first time. If you start writing code without testing the concept, you can throw away a lot of valuable time by following a suboptimal approach.The idea of SketchFlow
The idea of SketchFlow is to combine the simpleness and informality of sketching with paper and pencil with the dynamic of interactive prototypes. Most prototyping tools focus on creating high quality assets, but the main purpose of most prototypes is to proove the interaction design of your software and not to impress your management.To address this point the Team of SketchFlow has created special styles for controls that look as if they where drawn by pencil. This focus the discussion on real interaction problems instead of discussing about details like colors or fonts and suggests that the screen design is still changeable with a small effort.

Workspace setup
Expression Blend 3 includes a workspace management feature that allows you to hide all panels you don't need to sketch your prototype. You can save your settings by choosing "Save as new Workspace" from the "Windows" menu.
Create a new SketchFlow project
In Blend 3.0 you find two new project types to create prototypes for WPF or Silverlight.
Create and connect screens


Drop sketchy controls onto screens
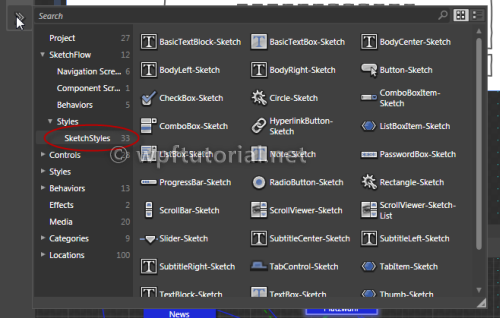
In the asset library you will find a new category "SketchFlow". It contains a section called "Sketch Styles". It contains special styles for most WPF or Silverlight controls that look like they are drawn by hand.

Extract common parts to component screens
If you have a part that is used on multiple screens, like a navigation or a login box, you can extract it to a component screen. This screen can be referenced on multiple screens. If you modify the component screen, the changes are reflected to all screens.


Wire-up navigation

Add sample data
A prototype needs to provide sample data to make it understandable. In flash prototypes, sample data is often just a bunch of textblocks and images. In SketchFlow we have a sample data generator, that creates real data sources that can be bound to lists and elements as real data. Selection, scrolling and sorting all works.
In the Data panel you find a database icon. It allows you to create a new sample data source.

Give the sample data source a name and specify the scope of visibility. This can be only on this screen or within the whole prototype. This can be useful, if you want to use the same demo data on multiple screens.

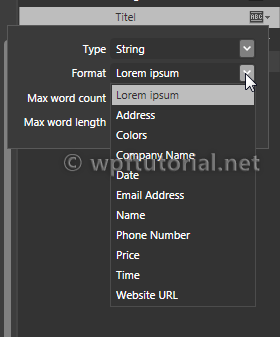
After creating the demo data source, you can define how a data record should look like. You can add properties or most popular types and choose from a variety of sample data types. There are URL's, e-mail adresses, bild text (lorem ipsum), images, and much mure...


Add assets from Photoshop, Illustrator or PowerPoint


Test prototype and get feedback


Generate prototype documentation
When you have finished your prototype, you can generate a design documentation by a single click. It includes the a table of content, the flow map and screenshots of all screens and components. It's not meant to use it as a complete documentation, but it's a good start to build on.


No comments:
Post a Comment