Introducing DataTemplates
All controls deriving fromItemsControl have a DataTemplate
that specifies how an object bound to an item is presented to the user.
The default template renders a single line of text per item - as we
know a listbox from HTML or WinForms.But WPF allows us to put whatever we like into a DataTemplate. If we want to display a list of customers we can provide a data template that shows an image for each customer next to its name and age. In my opinion this is one of the most powerful features in WPF.
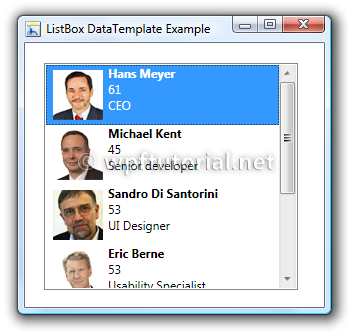
In the following steps I will show you how to create such an DataTemplate
Bind the data to the ListBox
We bind a list of employees to the listbox. Because the listbox does not know anything about our employee class, it calls theToString() method. The result is not yet very pleasing.<Grid x:Name="LayoutRoot"> <ListBox Margin="10" ItemsSource="{Binding}"/> </Grid>
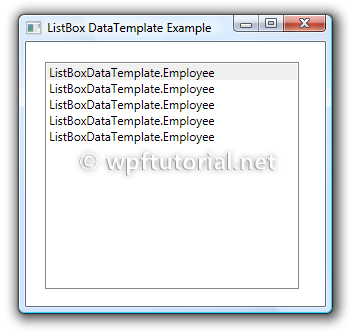
Override the ToString() method to improve the display
What we do next is to overriding the ToString() method to provide some useful information instead of just the type name. But a string is not really what we call a cool user experience.public override string ToString() { return string.Format("{0} {1} ({2}), {3})", Firstname, Lastname, Age, Role); }
Create a DataTemplate
The ultimate flexibility is to create your ownDataTemplate.
A data template can consist of multiple controls like images,
textblocks, etc. It han have a flexible width and height, background
color and shape. There are no limits for your creativity.An easy way to create a data template is to use Expression Blend. Open the context menu of your list box and choose "Edit Other Templates" -> "Edit Generated Items" -> "Create Empty".
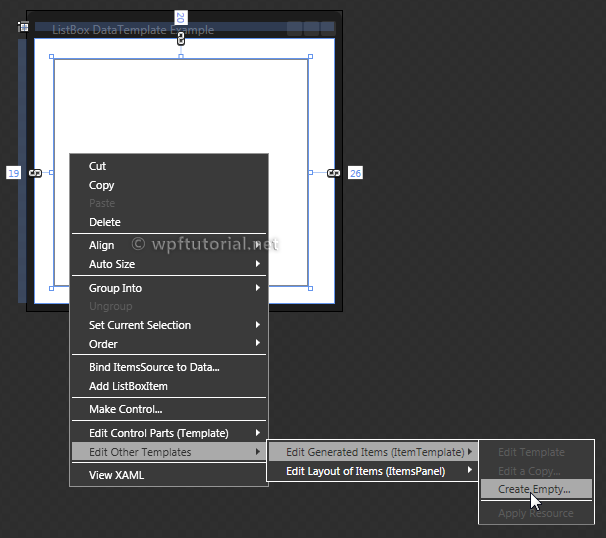 Blend will ask you to specify a name for your DataTemplate because it
will define it in the resources of either the Application, the current
document of an external resource dictionary. The name you specify is the
key for the resource dictionary.
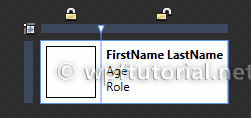
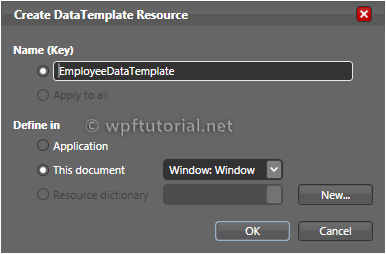 After you press OK, you will be in the editor to design the data
template. The item data (in our sample an employee) is set to the
DataContext, so you can easily access all properties of the employee by
using databinding.
<DataTemplate x:Key="EmployeeDataTemplate">
   <Grid>
      <Grid.ColumnDefinitions>
         <ColumnDefinition Width="60"/>
         <ColumnDefinition Width="*"/>
      </Grid.ColumnDefinitions>
   <Border Margin="5" BorderBrush="Black" BorderThickness="1">
      <Image Source="{Binding Path=Image}" Stretch="Fill" Width="50" Height="50" />
   </Border>
   <StackPanel Grid.Column="1" Margin="5">
      <StackPanel Orientation="Horizontal" TextBlock.FontWeight="Bold" >
         <TextBlock Text="{Binding Path=Firstname, FallbackValue=FirstName}" />
         <TextBlock Text="{Binding Path=Lastname, FallbackValue=LastName}" Padding="3,0,0,0"/>
      </StackPanel>
      <TextBlock Text="{Binding Path=Age, FallbackValue=Age}" />
      <TextBlock Text="{Binding Path=Role, FallbackValue=Role}" />
   </StackPanel>
  </Grid>
</DataTemplate>


No comments:
Post a Comment