Microsoft Dot Net Master

Microsoft Dot Net Master

Tuesday, July 31, 2012

UI Automation with WPF

How to make TextBlock within a DataTemplate visible to UI Automation

WPF intentionally hides TextBlocks that are inside a DataTemplate to improve performance. To make them visible, you have to replace them by a Label which can be a performance hit, or you make a special UiAutomationTextBlock that overrides this behavior:
 
public class UiAutomationTextBlock : TextBlock
{
    protected override AutomationPeer OnCreateAutomationPeer()
    {
        return new ModifiedTextBlockAutomationPeer(this);
    }
 
    private class ModifiedTextBlockAutomationPeer : TextBlockAutomationPeer
    {
        public ModifiedTextBlockAutomationPeer(TextBlock textBlock)
            : base(textBlock)
        { }
 
        protected override bool IsControlElementCore()
        {
            return true;
        }
    }
}
 
 
The Idea for that solution was found here

XAML Editors

Debugging and Development Utilities

Graphical WPF Designers

XAML Converters

How to Import Photoshop Files into WPF

Introduction

In a WPF project you often have to deal with assets that are created by a designer. They are often part of Adobe Illustrator or Photoshop files. There are two ways to achieve this goal. You can
  • Directly Import Photoshop Files in Expression Blend
    This is the most simple approach if you have Expression Blend 3. Drawbacks are, that you can only import vector shapes as Path elements. If you want to add these shapes into the resources, you have to manually extract the geometries.
  • Import Photoshop Files in Expression Design and Export to XAML
    This approach requires Expression Design to be installed but works already with Version 2.0. The workflow is a bit more complex, but you can choose if you want to export your shapes as Paths or Geometries.

Preparing the Photoshop File

If you create graphical assets that should be integrated to a WPF project you should think of the following rules to make the import easier.
  • Combine multiple vector shapes to one shape
  • Don't use layer effects, because they are mostly ignored by the converter
  • Set the color dept to 8Bit. Higher color depts cause errors on import

Directly Import Photoshop Files in Expression Blend

The following tutorial explains how to directly import an Adobe Photoshop file into WPF.
  • 1. Start Expression Blend and open an empty WPF project
  • 2. Choose "Import Adobe Photoshop File..." from the "File" menu.
  • 3. Select the file you want to import to Blend
  • 4. Check or uncheck the layers you want to import and click [OK].
  • 5. Blend imports the file now. Each layer will create a new Image or Path element. The images will automatically be added to a separate folder in your project.

How to convert Path to Resources

To convert imported Path objects to Geometry objects that can be consumes as resources you have to do the following steps:
  • 1. Copy the content of the "Data" attribute to the clipboard
  • 2. Create a StreamGeometry object and paste the content between the opening and closing tag. Give the geometry a unique key.

Import Photoshop Files in Expression Design and Export to XAML

The following tutorial explains how to import Adobe Photoshop Files in Expression Design and Export to XAML to use it in Expression Blend.
  • 1. Start Expression Blend and open the desired Photoshop File
  • 2. Check or uncheck the layers you want to import and click [OK].
  • 3. Open the Options Dialog in "Edit->Options->Clipboard(XAML)" and choose if you want to export shapes as Canvas or Resource Dictionaries.
  • 4. Select the objects you want to export and choose "Copy XAML" in the Edit menu.
  • 5. Go back to Expression Blend andpPaste the XAML snippet from the clipboard.

Expression Blend 2 AddIns

Expression Blend 2 AddIns

Introduction

Expression Blend has an add-in model that allows developers to write add-ins to extend its functionality. Unfortunately this is mainly unknown to most users of blend. A prominent example is the intellisense addin for blend.

Popular Addins

How to Load and Run an AddIn

To load and run an addin into expression, just pass a command parameter -addin followed the name of the add-in dll. You don't need any registration of plug-ins, but you can load only one addin on the same time. To get over this limitation you can use an add-in manager that dynamically loads multiple plugins even without restarting the tool.

C:\Program Files\Microsoft Expression\Blend 2\Blend.exe /addin:NameOfTheAddin.dll

Prototyping with Expression Blend 3 + SketchFlow

Prototyping with Expression Blend 3 + SketchFlow

Introduction

Software is getting even more complex, interactive and dynamic. It's nearly impossible, for a developer to find the best solution at first time. If you start writing code without testing the concept, you can throw away a lot of valuable time by following a suboptimal approach.

The idea of SketchFlow

The idea of SketchFlow is to combine the simpleness and informality of sketching with paper and pencil with the dynamic of interactive prototypes. Most prototyping tools focus on creating high quality assets, but the main purpose of most prototypes is to proove the interaction design of your software and not to impress your management.
To address this point the Team of SketchFlow has created special styles for controls that look as if they where drawn by pencil. This focus the discussion on real interaction problems instead of discussing about details like colors or fonts and suggests that the screen design is still changeable with a small effort.

Workspace setup

Expression Blend 3 includes a workspace management feature that allows you to hide all panels you don't need to sketch your prototype. You can save your settings by choosing "Save as new Workspace" from the "Windows" menu.

Create a new SketchFlow project

In Blend 3.0 you find two new project types to create prototypes for WPF or Silverlight.

Create and connect screens


Drop sketchy controls onto screens

In the asset library you will find a new category "SketchFlow". It contains a section called "Sketch Styles". It contains special styles for most WPF or Silverlight controls that look like they are drawn by hand.


Extract common parts to component screens

If you have a part that is used on multiple screens, like a navigation or a login box, you can extract it to a component screen. This screen can be referenced on multiple screens. If you modify the component screen, the changes are reflected to all screens.


Wire-up navigation


Add sample data

A prototype needs to provide sample data to make it understandable. In flash prototypes, sample data is often just a bunch of textblocks and images. In SketchFlow we have a sample data generator, that creates real data sources that can be bound to lists and elements as real data. Selection, scrolling and sorting all works.


In the Data panel you find a database icon. It allows you to create a new sample data source.


Give the sample data source a name and specify the scope of visibility. This can be only on this screen or within the whole prototype. This can be useful, if you want to use the same demo data on multiple screens.


After creating the demo data source, you can define how a data record should look like. You can add properties or most popular types and choose from a variety of sample data types. There are URL's, e-mail adresses, bild text (lorem ipsum), images, and much mure...


Add assets from Photoshop, Illustrator or PowerPoint


Test prototype and get feedback


Generate prototype documentation

When you have finished your prototype, you can generate a design documentation by a single click. It includes the a table of content, the flow map and screenshots of all screens and components. It's not meant to use it as a complete documentation, but it's a good start to build on.


Top 11 WPF Performance Tips

Windows Presentation Foundation provides a very confortable way to develop rich user experiences. A drop shadow for example can added by inserting two simple lines of XML. But this simplicity can also mislead us to overuse them. This leads to performance issues. The following tipps may help you to avoid or fix them.

  1. Dispatch expensive calls either within the UI thread with a lower DispatcherPriority by calling Dispatcher.BeginInvoke() or to a background thread by using a BackgroundWorker to keep the UI responsive.
  2. Fix binding errors because they consume a lot of time, trying to resolve the path error, including searching for attached properties. You can find them by looking for System.Windows.Data Error in the Visual Studio output log.
  3. Reduce the number of visuals by removing unneeded elements, combining layout panels and simplifying templates. This keeps the memory footprint small and improves the rendering performance.
  4. Prevent Software Rendering. The use of transparent windows by setting AllowsTransparency to true or using old BitmapEffects can cause WPF to render the UI in software on Windows XP, which is much slower.
  5. Load resources when needed. Even thow it's the most comfortable way to merge all resources on application level it can also cost performance by loading all resources at startup. A better approach is to load only often used resources and load the other on view level.
  6. Virtualize lists and views by using a VirtualizingStackPanel as ItemsPanel for lists. This only creates the visible elements at load time. All other elements are lazy created when they get visible. Be aware that grouping or CanContextScrol="True" prevents virtualization!
  7. Enable Container Recycling. Virtualization brings a lot of performance improvements, but the containers will be disposed and re created, this is the default. But you can gain more performance by recycle containers by setting VirtualizingStackPanel.VirtualizationMode="Recycling"
  8. Freeze Freezables by calling Freeze() in code or PresentationOptions:Freeze="true" in XAML. This reduces memory consumption and improves performance, because the system don't need to monitor for changes.
  9. Disable Assembly localization if you don't need it. By using the [NeutralResourcesLanguageAttribute]. This prevents an expensive lookup for satelite assemblies
  10. Lower the framerate of animations by setting Storyboard.DesiredFrameRate to lower the CPU load. The default is 60 frames/second
  11. Use StreamGeometries instead of PathGeometries if possible to draw complex 2D geometries, because they are much more efficient and consume less memory.

Other articles about WPF performance

WPF Performance Tools

There are two interesting tools to trace your WPF application and narrow down performance leaks:

Top 11 WPF Performance Tips

Top 11 WPF Performance Tips

Windows Presentation Foundation provides a very confortable way to develop rich user experiences. A drop shadow for example can added by inserting two simple lines of XML. But this simplicity can also mislead us to overuse them. This leads to performance issues. The following tipps may help you to avoid or fix them.

  1. Dispatch expensive calls either within the UI thread with a lower DispatcherPriority by calling Dispatcher.BeginInvoke() or to a background thread by using a BackgroundWorker to keep the UI responsive.
  2. Fix binding errors because they consume a lot of time, trying to resolve the path error, including searching for attached properties. You can find them by looking for System.Windows.Data Error in the Visual Studio output log.
  3. Reduce the number of visuals by removing unneeded elements, combining layout panels and simplifying templates. This keeps the memory footprint small and improves the rendering performance.
  4. Prevent Software Rendering. The use of transparent windows by setting AllowsTransparency to true or using old BitmapEffects can cause WPF to render the UI in software on Windows XP, which is much slower.
  5. Load resources when needed. Even thow it's the most comfortable way to merge all resources on application level it can also cost performance by loading all resources at startup. A better approach is to load only often used resources and load the other on view level.
  6. Virtualize lists and views by using a VirtualizingStackPanel as ItemsPanel for lists. This only creates the visible elements at load time. All other elements are lazy created when they get visible. Be aware that grouping or CanContextScrol="True" prevents virtualization!
  7. Enable Container Recycling. Virtualization brings a lot of performance improvements, but the containers will be disposed and re created, this is the default. But you can gain more performance by recycle containers by setting VirtualizingStackPanel.VirtualizationMode="Recycling"
  8. Freeze Freezables by calling Freeze() in code or PresentationOptions:Freeze="true" in XAML. This reduces memory consumption and improves performance, because the system don't need to monitor for changes.
  9. Disable Assembly localization if you don't need it. By using the [NeutralResourcesLanguageAttribute]. This prevents an expensive lookup for satelite assemblies
  10. Lower the framerate of animations by setting Storyboard.DesiredFrameRate to lower the CPU load. The default is 60 frames/second
  11. Use StreamGeometries instead of PathGeometries if possible to draw complex 2D geometries, because they are much more efficient and consume less memory.

Other articles about WPF performance

WPF Performance Tools

There are two interesting tools to trace your WPF application and narrow down performance leaks:

Application level resources & Windows Forms Integration

Application level resources & Windows Forms Integration

Download sample

When WPF is hosted in a Windows Forms application, you don't have a App.xaml. The question is, where to place application wide resources?
The answer is quite simple. Just manually create your own instance of an Application and merge the resources you want to have available on application level:
 
public Form1()
{
    InitializeComponent();
 
    // Create a WPF application 
    var app = new System.Windows.Application();
 
    // Load the ressources
    var resources = System.Windows.Application.LoadComponent(
        new Uri("Styles.xaml", UriKind.Relative)) 
        as System.Windows.ResourceDictionary
 
    // Merge it on application level
    app.Resources.MergedDictionaries.Add(resources);
}
 

How to extend the Aero Glass into the Client area

How to extend the Aero Glass into the Client area

Introduction

Windows Vista has a new default theme called Aero glass. In Aero glass, the title bar of a window and the frame is drawn transculent. This gives the UI a clean and lightweight look. This nice feaure is provided by a service that is called the desktop window manager (DWM).

Extending the Glass

By default the blurry glass effect is only on the title bar and the frame, but the client area is drawn opaque. But there is a simple way to extend the glass into the client area by using the DWM's API.
First thing you need to do is to include some Win32 functions from the dwmapi.dll library.
 
using System.Runtime.InteropServices;
using System.Windows.Interop;
using System.Windows.Media;
using System.Windows;
 
[StructLayout(LayoutKind.Sequential)]
struct MARGINS
{
    public int cxLeftWidth;
    public int cxRightWidth;
    public int cyTopHeight;
    public int cyBottomHeight;
}
 
[DllImport("dwmapi.dll")]
static extern int 
   DwmExtendFrameIntoClientArea(IntPtr hWnd, ref MARGINS pMarInset);
 
[DllImport("dwmapi.dll")]
extern static int DwmIsCompositionEnabled(ref int en);


I have written a helper method that does all the stuff to extend the glass by the specified amount of pixels on each border of the window.
 
 
/// <summary>
/// Extends the glass area into the client area of the window
/// </summary>
/// <param name="window"></param>
/// <param name="top"></param>
public static void ExtendGlass(Window window, Thickness thikness)
{
    try
    {
        int isGlassEnabled = 0;
        DwmIsCompositionEnabled(ref isGlassEnabled);
        if (Environment.OSVersion.Version.Major > 5 && isGlassEnabled > 0)
        {
            // Get the window handle
            WindowInteropHelper helper = new WindowInteropHelper(window);
            HwndSource mainWindowSrc = (HwndSource)HwndSource.
                FromHwnd(helper.Handle);
            mainWindowSrc.CompositionTarget.BackgroundColor = 
                Colors.Transparent;
 
            // Get the dpi of the screen
            System.Drawing.Graphics desktop = 
               System.Drawing.Graphics.FromHwnd(mainWindowSrc.Handle);
            float dpiX = desktop.DpiX / 96;
            float dpiY = desktop.DpiY / 96;
 
            // Set Margins
            MARGINS margins = new MARGINS();
            margins.cxLeftWidth = (int)(thikness.Left * dpiX);
            margins.cxRightWidth = (int)(thikness.Right * dpiX);
            margins.cyBottomHeight = (int)(thikness.Bottom * dpiY);
            margins.cyTopHeight = (int)(thikness.Top * dpiY);
 
            window.Background = Brushes.Transparent;
 
            int hr = DwmExtendFrameIntoClientArea(mainWindowSrc.Handle, 
                        ref margins);
        }
        else
        {
            window.Background = SystemColors.WindowBrush;
        }
    }
    catch (DllNotFoundException)
    {
 
    }
}
 
 
Next thing you need to do is calling the ExtendGlass in the OnSourceInitialized callback. Because that is the time the window handle has been created.
 
 
protected override void OnSourceInitialized(EventArgs e)
{
   base.OnSourceInitialized(e);
   GlassHelper.ExtendGlass(this, LayoutRoot.Margin);
}


Since the user (or the system) can enable or disable the glass effect while the application is running, we need to hook up a callback in the WndProc to undo or initialize the glass extension dynamically.
 
 
private IntPtr WndProc(IntPtr hwnd, int msg, IntPtr wParam, 
  IntPtr lParam, ref bool handled)
{
    if (msg == GlassHelper.WM_DWMCOMPOSITIONCHANGED)
    {
        GlassHelper.ExtendGlass(this, LayoutRoot.Margin);
        handled = true;
    }
    return IntPtr.Zero;
}
 

How to add Tasks to Jumplists in .NET 4.0 and Windows 7

How to add Tasks to Jumplists in .NET 4.0 and Windows 7

Introduction

Windows 7 provides a new taskbar feature for applications called jumplists. They appear, when you right-click on a application icon in the taskbar. By default you see a list of recent files opened and two entries to launch and detach the application.
.NET 4.0 provides a managed API that allows you to easily manipulate the entries in the jumplist.

How to add a Task to the Jumplist

A jumplist is nothing more than a categorizes list of links to files that can be launched by the user. The links are called JumpTasks. They can be parametrized with a title, description, icon, filepath and command line arguments.
In the following sample I create a new JumpList and add a task to the list that launches the sample application, but with a command line argument. If the application is launched with an argument, it shows a MessageBox instead.
 
public partial class App : Application
{
    protected override void OnStartup(StartupEventArgs e)
    {
 
        if (e.Args.Count() > 0)
        {
            MessageBox.Show("You have the latest version.");
            Shutdown();
        }
 
        JumpTask task = new JumpTask
        {
            Title = "Check for Updates",
            Arguments = "/update",
            Description = "Cheks for Software Updates",
            CustomCategory = "Actions",
            IconResourcePath = Assembly.GetEntryAssembly().CodeBase,
            ApplicationPath = Assembly.GetEntryAssembly().CodeBase 
        };
 
        JumpList jumpList = new JumpList();
        jumpList.JumpItems.Add(task);
        jumpList.ShowFrequentCategory = false;
        jumpList.ShowRecentCategory = false;
 
        JumpList.SetJumpList(Application.Current, jumpList);
    }
}
 

How to use the Windows Vista TaskDialog in WPF

How to use the Windows Vista TaskDialog in WPF

Windows Vista TaskDialog

Introduction

Windows Vista comes with an new standard dialog box called task dialog. The TaskDialog was developed as part of Windows Vista's "clarity" offensive to improve the user experience. It provides a lot more features than the original message box.
The TaskDialog is part of the comctrl32.dll library and only available on Windows Vista or later, its not part of WPF or the .NET framework. To use it from managed code, we need to write a interop wrapper.
This article is not finished yet... :-(

How to inline Images in a FlowDocument

Introduction

Sometimes you want to deploy, share or load just a plain XAML file containing a FlowDocument. Then you want to put in some inline images. HTML provides a functionality to express the image as Base64 encoded CDATA section, but WPF does not have such a functionality.

I found a solution how to do this, by creating a custom InlineImage element, that does the trick. The following example shows how to do it.
 
<FlowDocument>
    <InlineImage Width="100" Height="100" Stretch="Fill">
        <![CDATA[iVBORw0KGgoAAAANSUhEUgAAACAAAAAgCAYAAABzenr0AAAAB3RJTUUH2AQP
        SFlzAAALEgAACxIB0t1+/AAAAARnQU1BAACxjwv8YQUAAAnOSURBVHjaxVcLcBvVFT1vV
        ki3Hju3GCQnGjkObONQkJkxCSIHQQGnIdEr5TFs+LaGl7RRCSUvDp8nglH4mDGQ6EwZIm=]]>
    </InlineImage>
</FlowDocument>


Implementation of the InlineImage Control

 
namespace XamlInlineImageDemo
{
 
[assembly: XmlnsDefinition("http://schemas.microsoft.com/winfx/2006/xaml/presentation",
 "XamlInlineImageDemo")]
 
[ContentProperty("Base64Source")]
public class InlineImage : BlockUIContainer
{
    #region DependencyProperty 'Width'
 
    /// <summary>
    /// Gets or sets the width.
    /// </summary>
    public double Width
    {
        get { return (double)GetValue(WidthProperty); }
        set { SetValue(WidthProperty, value); }
    }
 
    /// <summary>
    /// Registers a dependency property to get or set the width
    /// </summary>
    public static readonly DependencyProperty WidthProperty =
        DependencyProperty.Register("Width", typeof(double),
        typeof(InlineImage),
        new FrameworkPropertyMetadata(Double.NaN));
 
    #endregion
 
    #region DependencyProperty 'Height'
 
    /// <summary>
    /// Gets or sets the height.
    /// </summary>
    public double Height
    {
        get { return (double)GetValue(HeightProperty); }
        set { SetValue(HeightProperty, value); }
    }
 
    /// <summary>
    /// Registers a dependency property to get or set the height
    /// </summary>
    public static readonly DependencyProperty HeightProperty =
        DependencyProperty.Register("Height", typeof(double),
        typeof(InlineImage),
        new FrameworkPropertyMetadata(Double.NaN));
 
    #endregion
 
    #region DependencyProperty 'Stretch'
 
    /// <summary>
    /// Gets or sets the stretch behavior.
    /// </summary>
    public Stretch Stretch
    {
        get { return (Stretch)GetValue(StretchProperty); }
        set { SetValue(StretchProperty, value); }
    }
 
    /// <summary>
    /// Registers a dependency property to get or set the stretch behavior
    /// </summary>
    public static readonly DependencyProperty StretchProperty =
        DependencyProperty.Register("Stretch", typeof(Stretch),
        typeof(InlineImage),
        new FrameworkPropertyMetadata(Stretch.Uniform));
 
    #endregion
 
    #region DependencyProperty 'StretchDirection'
 
    /// <summary>
    /// Gets or sets the stretch direction.
    /// </summary>
    public StretchDirection StretchDirection
    {
        get { return (StretchDirection)GetValue(StretchDirectionProperty); }
        set { SetValue(StretchDirectionProperty, value); }
    }
 
    /// <summary>
    /// Registers a dependency property to get or set the stretch direction
    /// </summary>
    public static readonly DependencyProperty StretchDirectionProperty =
        DependencyProperty.Register("StretchDirection", typeof(StretchDirection), 
        typeof(InlineImage), 
        new FrameworkPropertyMetadata(StretchDirection.Both));
 
    #endregion
 
    #region DependencyProperty 'Base64Source'
 
    /// <summary>
    /// Gets or sets the base64 source.
    /// </summary>
    public string Base64Source
    {
        get { return (string)GetValue(Base64SourceProperty); }
        set { SetValue(Base64SourceProperty, value); }
    }
 
    /// <summary>
    /// Registers a dependency property to get or set the base64 source
    /// </summary>
    public static readonly DependencyProperty Base64SourceProperty =
        DependencyProperty.Register("Base64Source", typeof(string), typeof(InlineImage),
        new FrameworkPropertyMetadata(null, OnBase64SourceChanged));
 
    #endregion
 
    #region Private Members
 
    private static void OnBase64SourceChanged(DependencyObject sender, 
        DependencyPropertyChangedEventArgs e)
    {
        var inlineImage = (InlineImage)sender;
        var stream = new MemoryStream(Convert.FromBase64String(inlineImage.Base64Source));
 
        var bitmapImage = new BitmapImage();
        bitmapImage.BeginInit();
        bitmapImage.StreamSource = stream;
        bitmapImage.EndInit();
 
        var image =new Image {
            Source = bitmapImage, 
            Stretch = inlineImage.Stretch,
            StretchDirection = inlineImage.StretchDirection,
             };
 
        if (!double.IsNaN(inlineImage.Width))
        {
            image.Width = inlineImage.Width;
        }
 
        if (!double.IsNaN(inlineImage.Height))
        {
            image.Height = inlineImage.Height;
        }
 
        inlineImage.Child = image;
    }
 
    #endregion
 
  }
}

How to use FlowDocuments

How to save or load a FlowDocument embedded images

There is a way to save and load a flow document including all embedded images by putting them into a XamlPackage. The following sample shows how to do this:
 
// Save 
var source = new FlowDocument();
var range = new TextRange(source.ContentStart, source.ContentEnd);
using (var stream = File.Create("output.pak"))
{
    range.Save(stream, DataFormats.XamlPackage);
}


// Load
using(var stream = File.OpenRead("output.pak"))
{
    var target = new FlowDocument();
    var range = new TextRange(target.ContentStart, target.ContentEnd);
    range.Load(stream, DataFormats.XamlPackage);    
}


How to navigate by hyperlinks

If you have a FlowDocument that contains Hyperlinks and you want to perform some action when the user clicks on the link, you can use hook up to the RoutedEvent Hyperlink.RequestNavigateEvent. The following code snippet shows you how to do it:
 
<Window x:Class="HyperlinksInFlowDocument.Window1"
    xmlns="http://schemas.microsoft.com/winfx/2006/xaml/presentation"
    xmlns:x="http://schemas.microsoft.com/winfx/2006/xaml"
    Title="Window1" Height="300" Width="300">
    <Grid>
        <FlowDocumentReader>
            <FlowDocument>
                <Paragraph>
                    <Hyperlink NavigateUri="http://www.google.ch">Google</Hyperlink>
                </Paragraph>
            </FlowDocument>
        </FlowDocumentReader>
    </Grid>
</Window>


public Window1()
{
    InitializeComponent();
    AddHandler(Hyperlink.RequestNavigateEvent, new RoutedEventHandler(OnNavigationRequest));
}
 
public void OnNavigationRequest(object sender, RoutedEventArgs e)
{
    var source = e.OriginalSource as Hyperlink;
    if (source != null) 
        Process.Start(source.NavigateUri.ToString());
}

How to use the Speech Synthesizer in WPF

Microsoft provides a new speech API (SAPI) for Windows Vista and later. It allows developers to build speech enabled applications. Simply add a reference to System.Speech and include the following code to your project.
 
using System.Speech.Synthesis;
 
SpeechSynthesizer synthesizer = new SpeechSynthesizer(); 
synthesizer.Volume = 50;  // 0...100
synthesizer.Rate = 3;     // -10...10
 
// Synchronous
synthesizer.Speak("Welcome to the WPF Tutorial.");
 
// Asynchronous
synthesizer.SpeakAsync("Welcome to the WPF Tutorial.");
 

Debugging style and template Errors

Common Errors

If you get the following error: Cannot animate ... on an immutable object instance. it could be that you are run into one of the following issues:
  • You are animating a dependency property without having a value set
  • You are animating a dependency property who's value is resolved by a DynamicResource
  • You are animating a dependency property who's current value is defined in another assembly that is not merged into the resource dictionary.
  • You are animating a value that is currently databound
  • You have an invalid property path specified.

How to control the frame rate for WPF animations

Animations are very cool, but they can cause a high CPU load. One reason could be a missing hardware acceleration due to a old graphics adapter or a software rendering constraint. Another reason could be the the high frame rate of animations that is set to 60 fps by default.
You can easily lower the framerate for all animations by overriding the DesiredFrameRate property of the timeline. Just add the following code to your project and play around with the setting to find a good tradeoff between performance and aesthetic.
 
Timeline.DesiredFrameRateProperty.OverrideMetadata(typeof(Timeline),
   new FrameworkPropertyMetadata { DefaultValue = 30 });
 
 
Or you can set the framerate individually for each animation in XAML, using the following code:
 
<DoubleAnimation Storyboard.TargetProperty="Opacity" Duration="0:0:0.5" 
                 From="1.0" To="0.5" Timeline.DesiredFrameRate="30" />

Introduction to WPF 3D

3D Graphic Basics

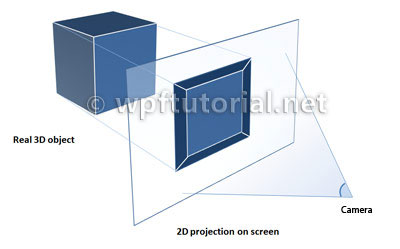
The basic idea of creating 3D graphics is to have a three dimensional model of an object. Because our screen is only two dimensional, we define a camera that takes a picture of the object. The picture is a projection of the object to a planar surface. This projection is rendered into an bitmap by the 3D rendering engine. The engine determines the color for every pixel by calculating the amount of light that is reflected by any light sources to the projection surface by the objects in the 3D space.
All surfaces of objects have a material and a brush. The material defines how much light is reflected for a specific angle and the brush defines the color. A brush can either be a simple color or a gradient or even an image called texture.

A world of triangles

In the world of 3D graphics, all objects are described by a set of triangles. But why triangles? The reason for this is that a triangle is the most granular geometry to describe a planar surface. The rendering engine can calculate the color of each triangle depending on its material and angle to the lights in the scene. If we would build our world on rectangles, the points don't need to be plane. The surface will be a lot more complex to calculate and render.
A surface of a 3D object is called a mesh. A mesh is defined by a number of 3D points. These points are called vertices. The vertices are joined together by a winding pattern to define the triangles. Every triangle has a front and a back side. Only the front side is rendered. The front side is defined by the winding order of the points. WPF uses a counter clockwise winding pattern. You can remember this with a simple mnemonic called the "right hand rule". This means if you close your right hand to a thumb-up gesture, your finger make a counter clockwise move while the thumb shows up. The fingers show the winding order, while the thumb indicates the upper-side of the triangle.

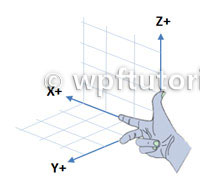
A right handed coordinate system

WPF uses a right-handed coordinate system. This means that if you hold the fingers of your right hand as shown on the picture, the fingers indicate the positive direction of the tree axes.

Elements of a 3D scene

  • Viewport3D
    The viewport is the control that builds the gate between the 2D and the 3D world.
  • Camera
    Every 3D scene has excactly one camera. The camera defines the Position and the LookDirection and the UpDirection of the viewer. WPF supports orthographical and perspective cameras.
  • 3D Models
    A 3D model defines an object in the scene. It has a Geometry that is the mesh and a Material that can be a diffuse, specular or emmisive material. The material itself has a brush.
  • Lights
    Without any lights you see nothing. So we need to place at least one light in our scene to illuminate our models. WPF supports different kind of lights, like:
    • AmbientLight
    • DirectionalLight
    • PointLight
    • SpotLight

Hello 3D-World - A Simple Cube

The following example shows how to create a basic cube mesh with 8 vertices that are wired up in 12 triangles that form the shape of the cube.
<Viewport3D>
   <Viewport3D.Camera>
      <PerspectiveCamera Position="-40,40,40" LookDirection="40,-40,-40 " 
                         UpDirection="0,0,1" />
   </Viewport3D.Camera>
   <ModelVisual3D>
      <ModelVisual3D.Content>
         <Model3DGroup>
            <DirectionalLight Color="White" Direction="-1,-1,-3" />
               <GeometryModel3D>
                  <GeometryModel3D.Geometry>
                     <MeshGeometry3D Positions="0,0,0 10,0,0 10,10,0 0,10,0 0,0,10 
                        10,0,10 10,10,10 0,10,10"
                        TriangleIndices="0 1 3 1 2 3  0 4 3 4 7 3  4 6 7 4 5 6 
                                         0 4 1 1 4 5  1 2 6 6 5 1  2 3 7 7 6 2"/>
                  </GeometryModel3D.Geometry>
                  <GeometryModel3D.Material>
                     <DiffuseMaterial Brush="Red"/>
                  </GeometryModel3D.Material>
               </GeometryModel3D>
            </Model3DGroup>
         </ModelVisual3D.Content>
      </ModelVisual3D>
</Viewport3D>

How to get a Bitmap from a Visual

How to get a Bitmap from a Visual

 
public void SaveImage(Visual visual, int width, int height, string filePath)
{
    RenderTargetBitmap bitmap = new RenderTargetBitmap(width, height, 96, 96,
                                                 PixelFormats.Pbgra32);
    bitmap.Render(visual);
 
    PngBitmapEncoder image = new PngBitmapEncoder();
    image.Frames.Add(BitmapFrame.Create(bitmap));
    using (Stream fs = File.Create(filePath))
    {
        image.Save(fs);
    }
} 

Images in WPF

How to set the Icon of a Window

If you try to set the Window.Icon from Codebehind, you probably get the error ImageSource for Icon property must be an icon file.. You can use the following snippet to do the trick:
 
var icon = BitmapFrame.Create(Application.GetResourceStream(
   new Uri("MyAppIcon.ico", UriKind.RelativeOrAbsolute)).Stream);
 
 
Note: You can get an "Image format is unrecognized" exception under XP, if the icon only contains compressed PNG files. In this case you have to recreate the icon without compression.

How to create a Thumbnail of an Image

 
private ImageSource GetThumbnail( string fileName )
{
   byte[] buffer = File.ReadAllBytes(fileName);
   MemoryStream memoryStream = new MemoryStream(buffer);
 
   BitmapImage bitmap = new BitmapImage();
   bitmap.BeginInit();
   bitmap.DecodePixelWidth = 80;
   bitmap.DecodePixelHeight = 60;
   bitmap.StreamSource = memoryStream;
   bitmap.EndInit();
   bitmap.Freeze();
 
   return bitmap;
}


How to automatically crop an image

The following method allows you to automatically crop an image to it's content.
 
public static ImageSource AutoCropBitmap(BitmapSource source)
{
    if (source == null)
        throw new ArgumentException("source");
 
    if (source.Format != PixelFormats.Bgra32)
        source = new FormatConvertedBitmap(source, 
                            PixelFormats.Bgra32, null, 0);
 
    int width = source.PixelWidth;
    int height = source.PixelHeight;
    int bytesPerPixel = source.Format.BitsPerPixel / 8;
    int stride = width * bytesPerPixel;
 
    var pixelBuffer = new byte[height * stride];
    source.CopyPixels(pixelBuffer, stride, 0);
 
    int cropTop = height, cropBottom = 0, cropLeft = width, cropRight = 0;
 
    for (int y = 0; y < height; y++)
    {
        for (int x = 0; x < width; x++)
        {
            int offset = (y * stride + x * bytesPerPixel);
            byte blue = pixelBuffer[offset];
            byte green = pixelBuffer[offset + 1];
            byte red = pixelBuffer[offset + 2];
            byte alpha = pixelBuffer[offset + 3];
 
            //TODO: Define a threshold when a pixel has a content
            bool hasContent = alpha > 10;
 
            if (hasContent)
            {
                cropLeft = Math.Min(x, cropLeft);
                cropRight = Math.Max(x, cropRight);
                cropTop = Math.Min(y, cropTop);
                cropBottom = Math.Max(y, cropBottom);
            }
        }
    }
 
    return new CroppedBitmap(source, 
             new Int32Rect(cropLeft, cropTop, cropRight - cropLeft, 
                           cropBottom - cropTop));
}


How to flip an image horizontally or vertically

The easiest way to flip an image in WPF is to use a TransformedBitmap. It's a wrapper around a BitmapImage that takes a generic Transform object.
 
var flippedImage = new TransformedBitmap(originalImage, new ScaleTransform( -1,1));