

In Visual Studio 2008
Open Visual Studio 2008 and choose "File", "New", "Project..." in the main menu. Choose "WPF Application" as project type.
Choose a folder for your project and give it a name. Then press "OK"

Visual Studio creates the project and automatically adds some files to the solution. A Window1.xaml and an App.xaml. The structure looks quite similar to WinForms, except that the
Window1.designer.cs file is no longer code but it's now declared in XAML as Window1.xaml
Open the
Window1.xaml file in the WPF designer and drag a Button and a TextBox from the toolbox to the Window
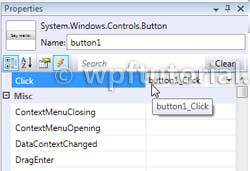
Select the Button and switch to the event view in the properties window (click on the little yellow lightning icon). Doubleclick on the "Click" event to create a method in the codebehind that is called, when the user clicks on the button.
Note: If you do not find a yellow lightning icon, you need to install the Service Pack 1 for VisualStudio on your machine. Alternatively you can doubleclick on the button in the designer to achieve the same result.
Visual Studio automatically creates a method in the code-behind file that gets called when the button is clicked.
private void button1_Click(object sender, RoutedEventArgs e)
{
    textBox1.Text = "Hello WPF!";
}
The textbox has automatically become assigned the name
textBox1 by the WPF designer. Set text Text to "Hello WPF!" when the button gets clicked and we are done! Start the application by hit [F5] on your keyboard.
No comments:
Post a Comment